Introducing KISSlicer
Hi, All.
I would like to introduce KISSlicer! (The old CLI version is here!)

I have been working on this slicer in my spare time to use with my RapMan 3.1. As the software is at a point now where it's actually useful, I want to release it into the wild. I threw together the webpage linked above to explain a bit about KISSlicer, but the two main features are its simplicity and speed (I'd tell you how much faster, but it might damage my credibility [8^) There is a download link on that page, but for simplicity sake, it's also here: download.
I'm working on completing the feature set of the free version right now, of which the only major thing missing right now is automatic support (for faces leaning out at > 45 degrees or so). I'd love to have as many testers as possible, and I really appreciate any feedback / complaints / suggestions / advice you care to share with me.
thanks!
Jonathan
Thanks Jonathan,
It is fast!!!!! Even considerably faster then netfabb, I really like the minimum thickness of surface feature! that is a good feature, that I don't think has been thought of!
When I get a chance I will print a calibration model I have to see how well it works. What is the order of features printed? ie loops perimeter then fill?
Looking that the slices in my viewer it seem to only plot the loops .5mm apart? even when I specify layer, head speed and extruder RPM settings that produce a 0.35mm extrusion width.. is that correct? I have a 0.5 dia nozzel but often print at .4 and .3 widths for delicate parts.
Cheers
James
Thanks, everybody! I really appreciate you trying it out!
James, each material type has a "known good reference" for extruding, with 4 variables: Extruder diameter, layer thicknes, head speed, and RPM. Once those 4 are given for a material, KISSlicer figures out the RPM for you given the extruder diameter, layer thickness and head speed you specify. So to change the effective extrusion diameter, simply go into _kiss_machine.ini and change ext_dia_mm to the desired value. I have printed parts with as small an effective extrusion diameter as 0.25mm with my 0.5mm head.
The slicer does loops then infill. If the infill type is specified as 0 there won't be any infill (good for making hollow parts from solid meshes...more useful once automatic support is working). Did you see infill in the preview during the slicing process?
Oh, z_settle_mm in _kiss_machine.ini defaults to a non-0 value...my fault; chylld already asked me to se the defauilt to 0. This might mess with your viewer.
thanks,
Jonathan
Oh Ok, what confused me was the wording. You are talking about “extruded width" not the “extruder’s diameter"? It would be good to change the words “extruder diameter” to “extruded width” as the use of “extruder diameter” refers to or implies the physical hardware.
I also feel it would be preferable to move the parameter that specifies the "extruded width" to the styles or materials file so it can be easily applied when executing the program.
Is the perimieter printed first? It would be good to have access to mod this setting as in skeinforge, the other thing I would really like is the ability to print the first layer at a overall slower setting using a ratio of the primary settings. The reason is I print raftless on a heated bed and when printing fast it is difficult to get the first layer to stick at say 40mm/s head speed. Also a setting that allows the perimeter to print slower then the body of the part would be good.
Yes I did see the infill during the preview of the slicing process. Is there a way to keep that screen up to view the slices?
Great suggestions, James, thanks. I will put the 1st-layer and outer-perimeter speed limits in place for the next build. As to a slider on the slice viewer, I could do that, or at least use the up/down or page-up/down keys. However it is mostly just feedback as to the state of the slicer / export...I usually use Axon for the in-depth review of the results. I'm definitely not trying to replace Axon, in fact I would be thrilled if KISSlicer was bundled with Axon 2 as an optional slicer. So, adding features to the viewer is pretty low on my priority list ringht now, sorry.
Thanks for the feedback!
Jonathan
Thanks for considering my suggestions Jonathan. FYI Axon is OK for viewing the slices but Netfabb studio basic is much better. It displays the slices over a grid that will reduce to (when zoomed in) 0.001mm increments which is very useful for review!
Viewing slices I understand it is not really necessary when other software can handle it. I have plenty more suggestions.... if you have the time the really big one that improves build time is the ability to perform infill every second or even third layer, this greatly speeds up the build time increasing machine life. "I'm definitely not trying to replace Axon/skeinforge..." but you are :-) and it needs to happen, Skeinforge just takes too long.
Thanks, James.
Chylld suggested the same thing regarding the infill. I have a wishlist going on Google Docs. If you would like, PM me your email address and I'll share the doc with you. Now's the time to get in all feature requests!
Jonathan
OK, I just uploaded an updated version (here). Here's the copy-n-paste from the changelog:
- Preliminary Support in place
- support_degrees: any triangles leaning out a greater than this angle will have support beneath them (90=disabled)
- support_area_fraction: drops a "centroid shadow" for each layer to be supported (e.g. will support a tip-down pyramid. 0=disabled)
- Shown in gray
- Custom speed for 1st layer (to stick better to the raft)
- Custom speed for perimeters (slow it down for a better surface)
- Fan turns on for the iso-surface extrusions only (minimize edge curling and object cooling stresses)
- de-stringing is modified to only enable when hopping islands and starting perimeter paths
- Graphical updates and improvements to build time estimates
As always, I really appreciate any feedback or requests.
thanks,
Jonathan
Hi Jonathan!
You are a genius! Your work is incredible, i have use it for different test with really good results, 0.25 layer print is very fast, i'm working with software parameters to setup up a 0.4 layer print with the same awesome results (speed end quality).
The last release have a automatic support feature that i think is a little bit "invasive", i think that is better have a flag for this option.
Thanks for your work!
Marco
Thanks, Marco!
Right you are, I just uploaded a version where you can simply disable support in the styles settings. And chylld pointed out that I can automatically calculate the support angle needed using the extrusion width, the layer thickness, and if the fan is on or off, so now that's all done. It's a simple as on / off. There is also a 0.5mm gap set between support and perimeter. Support is still considered alpha-level, though! The next step for support is to adjust the density of the support so it's very sparse when far from the surface it needs to support, and have it automatically increase the density as it gets close to the overhang it's supporting.
Thanks for the feedback!
Jonathan
Hi Jonathan, i have tried the new version with this figure and the support feature eneable (.25mm standard parameters)
This is the result
remove the support was quite simple
The inner and outer surfaces are intact and the print quality is high. The printing process was quick and clean.
Great work Jonathan!!!
Some suggestions for settings the parameters for .4mm layer printing?
Thanks!!!
Marco
Nice looking print, Marco!
Sorry it's taken me so long to reply. I have an update in the works that improves the infill and support optimization (and some issues like the infill possibly crossing the iso-lines.) I hope to have the update up in a day or two, after some more testing.
Basically, changing the layer thickness to 0.4mm should be very easy. In the styles INI file, z_step_mm changes to 0.4 (obviously), then you want to update wall_width_mm. If you want to have 3 solid layers on top and bottom, you would make that value = 3.1 * z_step_mm, or ~ 1.25. With those two things changed, everything else should remain the same, and KISSlicer will compute RPMs and support angles for you.
thanks,
Jonathan

Great work ! It's real FAST and the resulting Gcode looks clean to me. I only noticed that M227 for anti-stringing is not taken into account.
Now I'm gonna print a test piece to see the result.
EDITED : I printed my first test object with it and the result is great. The honeycomb filling pattern is the best I ever had !
But I have 3 remarks :
1) it seems that the printed object is rotated 45° in Z
2) the raft has no margin (isn't bigger than the printed part)
3) the number of solid layer seems to be fixed at 2 and can't be changed
Still a very, very good slicer and alternative to Axon/Skeinforge.
Thanks, anar! I appreciate you testing out KISSlicer!
My responses to the comments:
- The M227 is in effect, but I only turn it on when printing the perimeter path, or when jumping to a new island (isolated region of fill). I will expand that in the future to also check if a jump-path crosses a perimeter, which is possible on some objects. This really seemed to cut down the stress on my extruder gears by cutting down the number of times they have to quickly drive backwards then forwards again.
- The object does get rotated. KISSlicer rotates each object so it fits inside a minimum-area bounding box. This is so the Multiply and Pack features can minimize the total build area when cramming a bunch of objects onto a single sheet. I can see times where this is a problem, like if you're printing a part so long it needs to be diagonal to fit on the bed...maybe I can add a flag like '--no-rotate' to keep that from happening. The optimum infill orientation is calculated from the model, so that is not affected by the models final rotation, though.
- The raft is too small, you are right. I'm actually working on code right now that adapts the support (and possibly the sparse infill) to be more sparse the farther away it is from the upper surface it needs to support. Once that is in, I'll be tuning the raft oversize value.
- The solid layers are generated via a new mechanism, the 'wall_width_mm' parameter inside the styles INI. What this does is make sure the outside wall of the object is solid to a given thickness, on the sides and top and bottom (and diagonal...wherever). So, if you want 5 layers solid, you can make wall_width_mm equal to 5.1 * z_step_mm. This will also fill in extra solid stuff inside the perimeter, if the number of iso_lines specified don't already cover it.
Thanks again for your help and comments! I'll keep working on it!
Jonathan

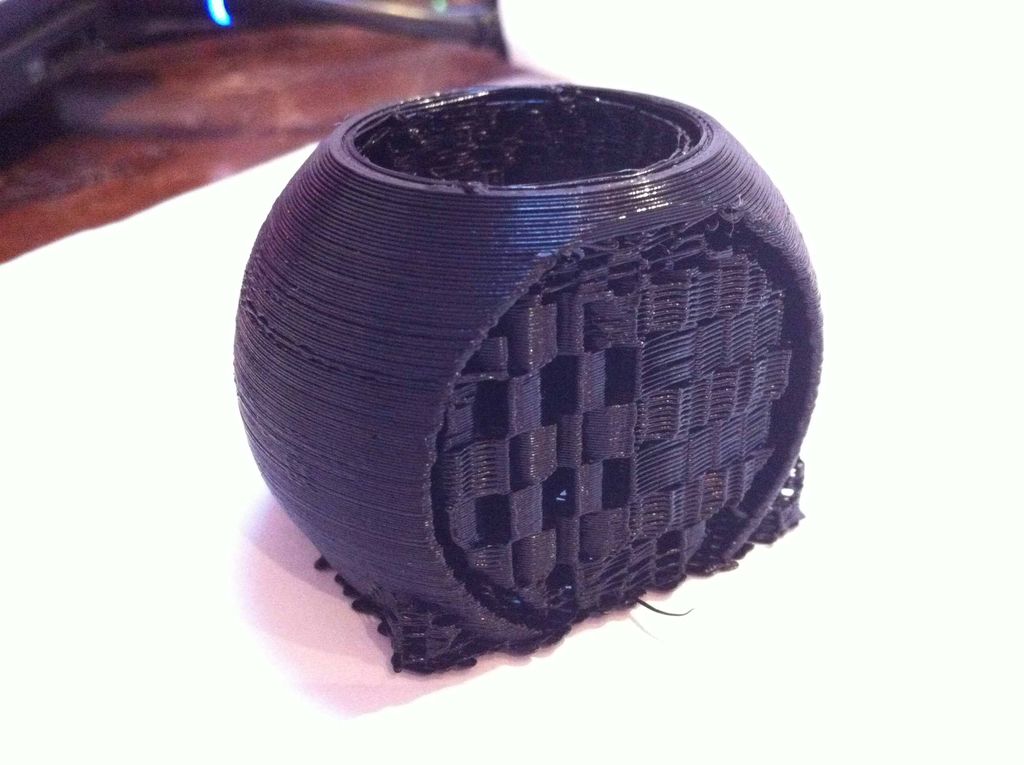
finally printed my first model with kisslicer :) starting to wonder why i bothered with all that SF stuff when kiss slices my models in 10 secs max!??
anyway here's a half-size version of a character model from one of my clients, printed with ABS and default kiss settings except for 248C raft, 13.5 reference RPM and fan disconnected. first, straight out of the printer:

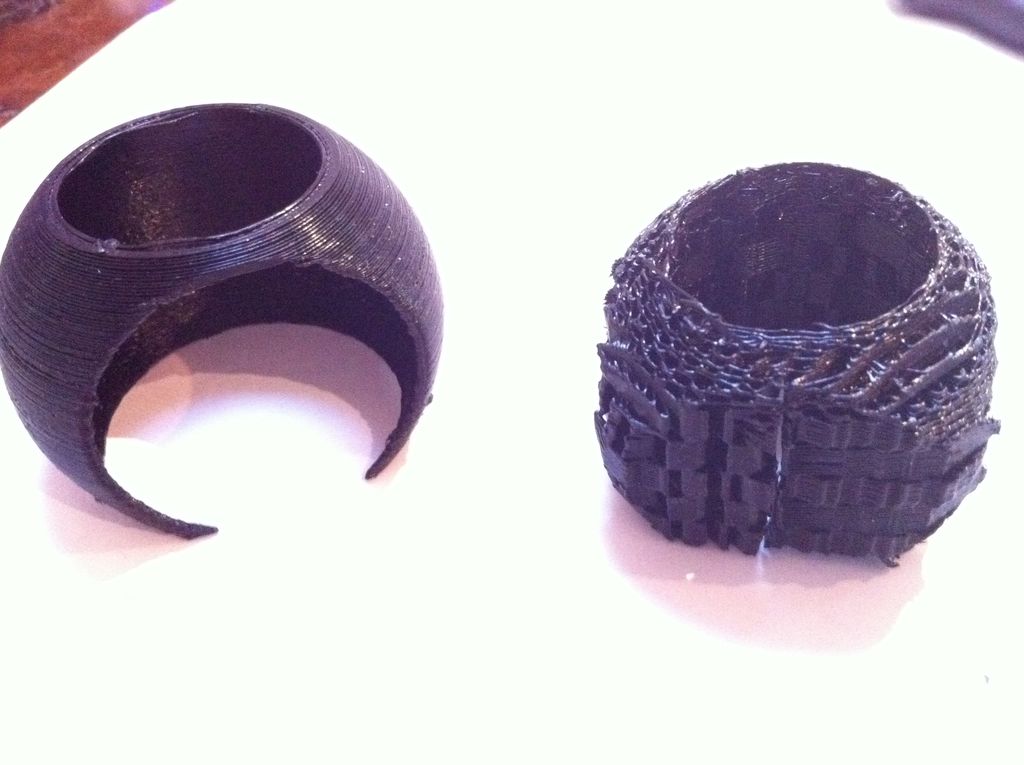
second, after support is removed (with pliers and cutters, only takes a few mins) :

third, after giving it an acetone bath just for the fun of it :)

Hi Chylld, beautifull character, a question... When you say "acetone bath" what do you mean? I print only with ABS, and i use acetone for finishing the objects but in small quantity on a rag. You really dive the object into acetone? How long time? You wipe with air or with rag?
Thanks !
Marco
Just tried KISSlicer - wow, it's fast! Or perhaps, it shows how slow Python is. Either way, nice job.
I tried transferring the profiles from Axon 2 which I have been successfully using to print ABS, by editing the INI files, but I wasn't sure exactly how to translate some of the settings. A test print failed pretty quickly because the raft failed to stick. I guess I need to do some more tinkering with the settings.
One feature I noticed, which also seems to be present in Skeinforge, is that the nozzle is moved back across sections already printed in the layer. This tends to drag strings across the surface, and in my case, it dislodged the raft. The raft was printed in two parts, which seemed unncessary. With skeinforge I get plastic on the nozzle which burns leaving lumps of burnt plastic in the print. If you could solve that it would be great.
I also noticed some problems slicing small cylinders, I will try to post a pic if I can get one.
Nice to see KISSlicer correctly sliced a hyperboloid pencil holder which Skeinforge did not, and in 10 seconds versus 48 minutes!. I didn't notice until half way through the print that SKeinforge added some extra holes ;)
i use acetone for finishing the objects but in small quantity on a rag. You really dive the object into acetone? How long time? You wipe with air or with rag?
yep i fill a takeaway food container with acetone and then submerge the object in it for about 5-10 seconds, shaking it around a bit. then i give it a bath in water and let it dry for a few minutes by standing on a paper towel.
Chylld, nice print! Thanks very much for posting that, and for the updated settings.
Please note, everybody, that my default settings are for one specific ABS type I'm using right now...I'll be asking for some more feedback to try to make the defaults more optimized for the majority of users in a bit. Please note also that chylld was using a new prototype of a pillar-type raft...think a hex-grid on a Hershey's Kiss array of plastic daubs...seems to work pretty well! It will be in the next version, (and will stay in the free version too, since I needed it to print a very large object...my bed isn't flat enough for the regular style raft)
@bobc: thanks for testing KISSlicer! Hopefully the next version's raft style will solve the raft issues when it comes out (I keep hoping to release, then fix small bugs or add some new stuff...but soon!). And that is a very good point about crossing an already-printed island. I'l think about that and see if I can come up with a non-kludgy way of solving the issue. Really small features are an issue in KISSlicer due to the method of computing each slice's filled-in-area. You can use a smaller extrusion with in a style to compensate for this, to some extent...works well for very fine models. I do have one feature planned that should help with thisto some extent, if the issues is what I'm believing it is...could you send me a small model demonstrating the problem? PM me and I'll send you my email address.
thanks,
Jonathan
Yes, very nice print Chylld ! I wanted to ask exacly the same about the acetone bath. I'm going to try that.
I also like the KisSlicer very much. It works damn well !
Thanks, Anar! Very kind of you.
OK, a new version is up, and I'd appreciate any testing and feedback, as the new raft style is a big change. Here's the changelog from the webpage:
- Improved path computations
- Infill joins now conform to the iso-contours
- Running KISSlicer with no arguments generates a simple circular test script
- Added comments to each generated .bfb file, recording the settings used to slice it
- Fixed a case where too many digits in a coordinate would choke the RapMan 4.1.1 firmware
- Added "Hershey's Kisses" raft
- extrudes small pillars, then a hex layer, then a simple regular-lines layer
- much more tolerant of uneven beds
- Tracks the build-time for each sub-type (support, infill, pillars, etc.)
- Added x,y offsets to the Machine INI file, as 0,0 seems to be about 20mm forward of the actual center
- Added ABS and PLA reference materials
Oh, and a small side note: I think of the software name as "KISS - Slicer", but a friend of mine just made fun of me for "KISS - licker" [8^) But, in seriousness, I'm hoping the name is clear and non-offensive. Please let me know if anyone has a problem with it (via PM if you want anonymity).
thanks again, everyone!
Jonathan
I did some slicing test of a same object but with different LoD (number of vertices/faces) using KisSlicer free version.
Here are the results :
| Number of polygons | Slicing time | Printing time |
| 5000 | 3 mn | 4 days and 21 mn |
| 10.000 | 3 mn | 4 days and 00 mn |
| 25.000 | 3 mn 06 s | 3 days 23 h and 56 mn |
| 50.000 | 3 mn 11 s | 3 days 23 h and 55 mn |
| 100.000 | 3 mn 24 s | 3 days 23 h and 44 mn |
| 250.000 | 4 mn 19 s | 3 days 22 h and 53 mn |
| 500.000 | 7 mn 22 s | 3 days 22 h and 08 mn |
| 1.000.000 | 18 mn 49 s | 3 days 19 h and 35 mn |
| 1.500.000 | 37 mn 03 s | 3 days 17 h and 20 mn |
This is the mesh I did my tests with, using all the default parameters :

As you can see Slicing time grows along with the density of the mesh (which was expected). But the growing is exponential especialy after 500K polys. You will also notice that Printing time is somehow constant (which was also expected). It just tends to decrease as polys get higher but in a reasonable margin. Anyway, don't expect dense meshes to print faster than low ones. It should take the exact amount of time...
In conclusion :
Even though decimating your hi poly meshes before printing is a good habit (scan data for ex.), it is less important with KisSlicer than with Axon.
Hmm. I'm not a fan of the new raft. Going down to Z0 seems like a risk, and lots of Z movements will not be good on the Z motor. I am also not convinced about rotating the object, I would prefer it aligned the same way as the STL.
Thing is, the Axon 2/skeinforge combo produces a raft which is reliable and works very well, at least for me. I am not sure why you would want to invent something different - keep it simple? So I think I will have to pass on this version.
I managed to get a full print using the previous version KISSlicer and had some problems. The raft stuck too well, and removing the object ripped off the bottom layers of the object. I had to remove the bed and then chisel off the raft. The hexagon fill seems to have good strength in X-Y but doesn't help much in the Z direction. There was actually quite poor definition on holes in the X-Y plane, maybe the loose bobbles of plastic that fell on the bed were something to do with that.
It would be great if you could combine the "tried and trusted" techniques with the speed of KISSlicer, I think that could be winner.
Hi, bobc. Thanks for checking it out, and for the feedback. I'm going to intersperse my responses:
Hmm. I'm not a fan of the new raft. Going down to Z0 seems like a risk, and lots of Z movements will not be good on the Z motor...
Thing is, the Axon 2/skeinforge combo produces a raft which is reliable and works very well, at least for me. I am not sure why you would want to invent something different - keep it simple? So I think I will have to pass on this version.
The new raft was implemented out of desperation! Here's the backstory: I've been trying to print a part for about 4 days, and failing. First my bed wasn't completely level, so I would ground the head into the acrylic bed...not good. Removed, chiped off the stuck portions of the raft, sanded the bed, and leveled it (using a simple calibration script to extrude simple concentric circles). Now, the bed was level, so printed the object again with 0.25mm layers...FAILED! The bed was too uneven, I would get patches where the head was too high for the raft to stick to the bed, and places where the head would still ground itself. So, cleanup again, set the z height to zero on the highest "hill" of the bed instead of the center, printed at 0.5mm...FAILED AGAIN! The bed unevenness was hilly, and I still got spots where the raft wouldn't stick to the bed because the gap was too large. Turns out I could print the raft at 1mm layers, but there would be sections so squashed together as to not be a raft but a thick 1st layer, which stuck to the bed. That is when I implemented the new raft style. Here are my bullet point justifications of the new raft:
- On RapMan style machines, the bed is spring loaded in Z. Overshooting a little in a z-only move is better than doing xy while too low (of course, better to do neither!)
- The Z-motor is the same size as the X & Y, and though there is much more resistence, it's only travelling at ~1/7th the speed of an XY move.
- I don't actually go down to Z=0, the bottom of the plunge/retract is 0.25 above the bed height.
- The new raft doesn't seem to warp, and is much easier to get off the bed as well
I will add back in a traditional raft option, though I would really appreciate you playing with the new version and reporting your findings (money back guarantee if you aren't satisfied [8^)
I am also not convinced about rotating the object, I would prefer it aligned the same way as the STL.
Agreed. I will change KISSlicer so it will only rotate the objects if packing a bunch of them on the bed...for a 1-off print I will enforce 0-rotation.
I managed to get a full print using the previous version KISSlicer and had some problems. The raft stuck too well, and removing the object ripped off the bottom layers of the object. I had to remove the bed and then chisel off the raft. The hexagon fill seems to have good strength in X-Y but doesn't help much in the Z direction.
Raft sticking was mentioned above, but in terms of Z-strength, I think the issue is actually the flow-rate KISSlicer was using. I had a fairly low flow-rate for a material I'm using here. Chylld had the same delamination issues you did, and said that increasing the reference RPM by about 25% fixed the issue for him. I updated the defaults on the most recent version of KISSlicer (the one currently available, with the pillar raft) to use his recommended settings, so hopefully that will work for the majority of users by default (instead of just me [8^)
There was actually quite poor definition on holes in the X-Y plane, maybe the loose bobbles of plastic that fell on the bed were something to do with that.
What size holes, and what extrusion width? If it's what I think it is, I may have a fix for this, hopefully in the next revision.
It would be great if you could combine the "tried and trusted" techniques with the speed of KISSlicer, I think that could be winner.
I agree for the most part. Other than the slow speed of SF, the main reasons KISSlicer came into being was that I wanted software where the options were related to physical parameters, and the slicer would do the right thing in general without me having to tweak too much. Things like the new raft style are definitely a bit of a gamble, but the old style really wasn't working for me, admittedly due to the limitations of my hardware, but I'm sure others have the same problem. KISSlicer is definitely in the middle of growing pains, and I'm sorry to pass those on to you and the others who are graciously testing KISSlicer.
Thanks again for the feedback!
Jonathan
Ok, thanks for your comments.
The print bed does need to be flat and level to within +/-0.1mm or whatever, and I don't think that can really be fixed by software. I looked at the GCode from the latest version, and I see code like this:
M103
M107
G21
G90
M228
M104 S260
M551 P19200 S1000
M108 S292
G1 X-27.94 Y21.42 Z1 F30000
M101
G1 X-27.94 Y21.42 Z0 F250
G1 X-27.94 Y21.42 Z1 F250
M103
G1 X-26.84 Y19.17 Z1 F30000
M101
G1 X-26.84 Y19.17 Z0 F250
G1 X-26.84 Y19.17 Z1 F250
M103
G1 X-23.05 Y18.24 Z1 F30000
M101
G1 X-23.05 Y18.24 Z0 F250
G1 X-23.05 Y18.24 Z1 F250
M103
G1 X-21.96 Y15.99 Z1 F30000
M101
G1 X-21.96 Y15.99 Z0 F250
G1 X-21.96 Y15.99 Z1 F250
which has Z=0. A bug perhaps?
Of course, you are writing the software so that it works well for you, which is great, but it doesn't look like it is going in a direction I would want to use.
My g-code looks the same... it goes to Z=0 and looking at the machine run it does look like it hits Z=0. It's not a new type of raft (netfabb's pillar raft is very similar) but it's probably the best way to account for an uneven bed.
The acrylic bed on my rapman is currently warped like bonkers - if you put it on a flat table, 1 corner now sticks up about 1cm in the air (yes, 1cm, not 1mm). It doesn't even fit on the lower bed level anymore as the warp has pulled all the bolt holes closer and they no longer line up. Price to pay for experimenting with a heated acrylic bed I guess!
I now use an Alu bed and have tried the new pillar-style raft. With ABS and a 60C heated bed, the print warped more than either a normal raft or raftless. However if my bed was uneven, it would be the only option as the first normal raft / object layer would either not adhere, or not exist (due to the head scraping along the bed)
My 2 cents :)
Good catch on the Z=0, you two. That is definitely a bug. I am away from my computer for about 2 days, but I'll fix that ASAP.
thanks,
Jonathan
Hi Jonathan, here my test with the new version,
the object is a shaft support, 3 copy of the same object, standard parameters, hot bed 128 degree, chamber about 45 degree, ABS on Kapton tape
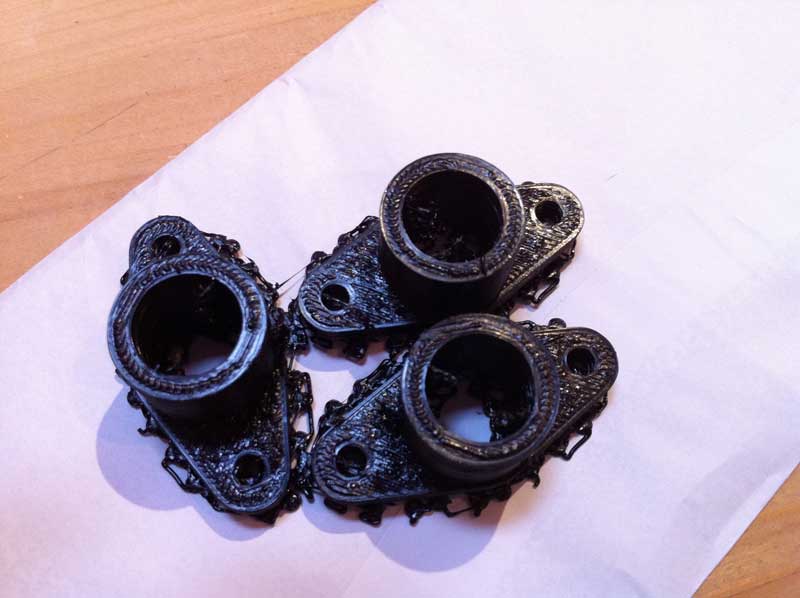
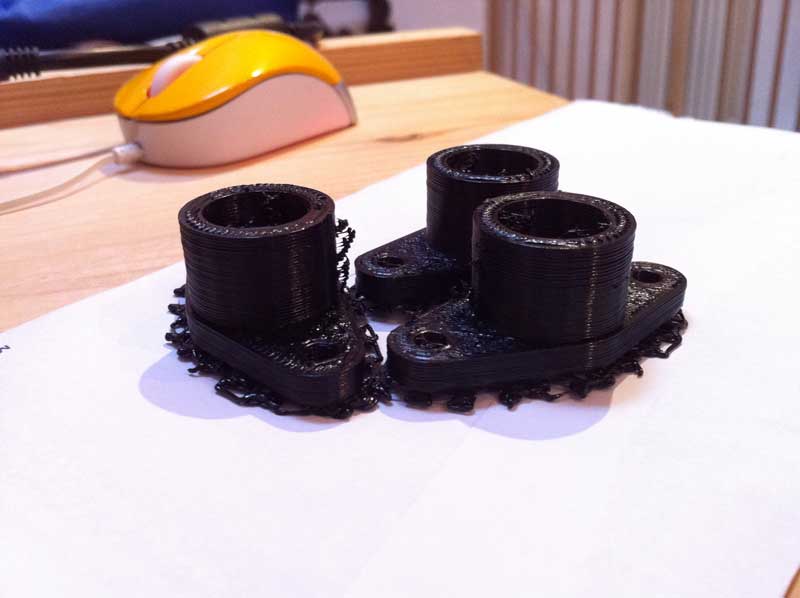
the prind is very good and the new support is very powerfull with my hot bad configuration (i need to swich off the hot bed and lower the temperature for remove the object...)
maybe stringing still a bit much? But very easy to remove...
I made some measurements for compare the real (3d stl) and the printed object here the results
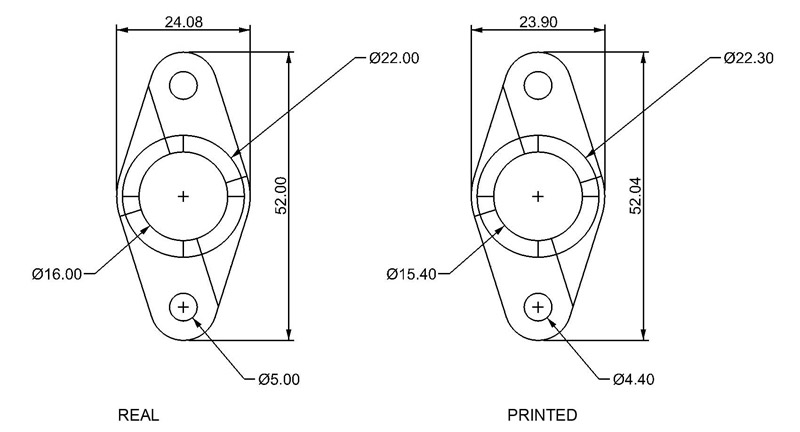
everything perfect except the diameter of the holes and cilindrical parts, how can I correct this gap?
Thanks for your work!
Marco
Hi, Marco. Thanks for the pics and the feedback. I think the part oversizing if a function of 2 things: 1 - the layers stick better together is you extrude slightly more volume than strictly necessary, so you end up with slightly fatter walls, and 2 - check out this link on Arc Compensation. I can probably do something about #2 automatically, but #1 will probably require another tweaking factor in the setting files (which I can do, I just don't like it!) I will definitely keep this issue on the radar and let you know if I can come up with something easy to fix it.
In other news, I just uploaded a new version, not too much changed....here's the log:
- Fixed pillars going to Z=0
- Both Standard raft and Pillar raft are available
- Speed up (~25% faster....don't get used to it, I still have more features to add!)
- Parts only rotate if multiple parts are printed
Thanks again for your testing and feedback, everyone!
Jonathan
It's great to see an alternative to Skeinforge, very nice work!
I was very excited to try KISSlicer because Skeinforge seems completely unable to handle a certain kind of model: a (non-loop) single filament width wall or ribbon. Unfortunately, KISSlicer doesn't seem to work in this case either. I tried to slice a curvy, 0.65mm thick ribbon, hoping for a single filament path from one end to the other. Instead, KISSlicer created a number of small circles along the length, with large gaps inbetween.
I then tried two straight unconnected rectangular segments, 0.5mm thick. KISSlicer simply crashed. I increased the wall thickness a few times, and it managed to slice at 0.82mm thick, but laid down two lines (per rectangle). It doesn't seem like that should happen, since the default filament thickness is 0.5mm, right?
It seems that both KISSlicer and Skeinforge expect at least one complete loop (so a single filament thick closed box will work). What's interesting to me is that the default Skeinforge raft is actually a single, unclosed path, but it refuses to slice a model like that.
It is probably not an issue that many people run into and maybe not something worth fixing, but thought I would mention it anyway. If anyone has a solution I would love to hear it.
Also, when running KISSlicer it would pop up a visualization window (like in your screenshot), but it would disappear as soon as it finished slicing (basically instantly). Is that the intended behavior, or is there a way to make it stick around?
as the other Jonathan, I have to say, awesome stuff Jonathan :)
excited to see how this comes along. tested some of my largest models which took my machine 50 minutes to compile in Skeinforge v41, and your program did it in 50 SECONDS lol.